Python程序打包为可执行程序的几种方法
程序编写完成后需要打包,对于打包我们可能有以下一个或多个需求:
-
打包成开源/闭源程序
-
打包成可执行程序,系统无需安装python环境也能使用
-
对源码进行加密混淆,不能被轻易破解
本文总结将Python程序打包成可执行程序的几种方法和一些工具。
0x00 前置知识
文件
pyc文件
PYC文件是Python的字节码文件(Bytecode File)的扩展名,它是经过Python解释器编译后生成的二进制文件。当Python脚本(.py文件)被解释器执行时,解释器会将其编译为字节码,并将字节码保存到PYC文件中。下次再次执行相同的脚本时,解释器会直接加载对应的PYC文件,而无需再次编译源代码,从而提高执行效率。
pyd文件
pyd 文件是用 Python 编写的动态链接库,可以在运行时由其他 Python 代码运行。它包含一个或多个 Python 模块,便于代码重用,并为编写应用程序提供模块架构。可以使用 .pyd 扩展名创建和保存 PYD 文件,例如 helloworld.pyd。应用程序开发人员可以使用 import 语句将 PYD 模块包含在他们的应用程序中。 PYD 文件可以使用适用于 Windows、Mac 和 Linux 操作系统的 Python Software Foundation Python 打开。
pyz文件
“pyz"文件通常是指一个Python Zip Archive(Python压缩归档)文件。该文件使用压缩算法将多个Python模块、库和脚本打包在一起,以便于分发和共享。
Python Zip Archive文件通常具有”.pyz"扩展名,并且可以通过Python解释器直接运行。在运行时,Python解释器会解压缩该文件并执行其中的代码。这种打包方式可以用于将单个可执行文件中的所有依赖项捆绑在一起,使得应用程序更易于分发和部署。
whl文件
whl文件(wheel file)是Python软件包的一种打包格式,它是一种更先进、更完整、更方便的Python软件包安装和传播方案。相比于普通的Python软件包安装方式(通过源码安装),使用whl文件进行Python软件包的安装更加方便、更高效、更不容易出错。
whl包含了预编译的Python库文件、依赖配置、安装脚本等内容,因此在大部分情况下,我们可以直接通过pip命令,用whl文件进行Python包的安装。例如,可以使用以下命令安装已经下载好的whl文件:
包导入
隐式导入(hidden import)
在打包过程中,某些模块的导入可能无法被打包工具自动识别出来。这可能是因为这些模块的导入是动态的、条件的或者在运行时根据一些动态因素发生的。此时,就需要通过指定"hidden import"来告诉打包工具这些模块的存在,以便正确打包。
例如,一些动态导入的模块、通过字符串导入的模块或者其他特殊情况下的模块,需要使用"hidden import"来确保打包工具能正确地识别它们的存在,并将其包含在打包后的可执行文件中。
0x01 PyInstaller
重要组件
Analysis(分析器)
用于分析程序的导入和依赖。
PYZ(Python Zip)
EXE
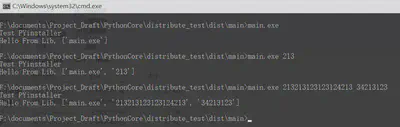
简单示例
# main.py
import sys

import lib


def say_hello():
    try:
        lib.hello(sys.argv)
    except Exception as e:
        print(f"Exception {repr(e)}")

if __name__ == "__main__":
    print("Test PYinstaller")
    say_hello()
# lib.py
def hello(msg="deafule"):
    print(f"Hello From Lib, {msg}")
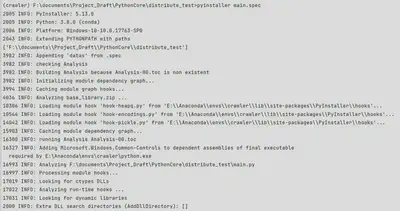
当执行如下命令后,pyinstaller会生成main.spec文件(存储在–specpath参数指定的目录中,默认是当前目录)。
pyinstaller main.py
# -*- mode: python ; coding: utf-8 -*-
block_cipher = None
a = Analysis(
    ['main.py'],
    pathex=[],
    binaries=[],
    datas=[],
    hiddenimports=[],
    hookspath=[],
    hooksconfig={},
    runtime_hooks=[],
    excludes=[],
    win_no_prefer_redirects=False,
    win_private_assemblies=False,
    cipher=block_cipher,
    noarchive=False,
)
pyz = PYZ(a.pure, a.zipped_data, cipher=block_cipher)

exe = EXE(
    pyz,
    a.scripts,
    [],
    exclude_binaries=True,
    name='main',
    debug=False,
    bootloader_ignore_signals=False,
    strip=False,
    upx=True,
    console=True,
    disable_windowed_traceback=False,
    argv_emulation=False,
    target_arch=None,
    codesign_identity=None,
    entitlements_file=None,
)
coll = COLLECT(
    exe,
    a.binaries,
    a.zipfiles,
    a.datas,
    strip=False,
    upx=True,
    upx_exclude=[],
    name='main',
)
.spec文件告知pyinstaller如何处理脚本,其编码了脚本的名称和大多数打包选项,pyinstaller根据spec文件的内容来构建可执行程序。 大多数情况下无需修改spec文件,通常已经给出了足够的信息作为pyinstaller的打包选项。然而,以下情形你需要修改spec文件:
- 你希望将数据文件捆绑到可执行程序中
- 你希望将动态依赖库(.dll, .so)包含在可执行程序中
- 你希望将Python的运行时选项添加到可执行程序中
- 你希望将多个程序捆绑成一个公共模块
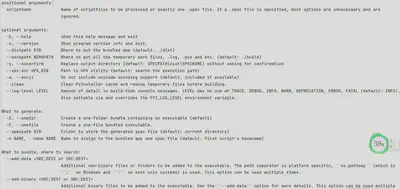
可以通过pyi-makespec options name.py [other scripts…]命令创建spec文件,该命令仅创建spec文件但不会构建可执行程序。当你将name.spec文件修改到符合要求时,可通过pyinstaller命令进行打包.
pyinstaller options name.spec
注: pyi-makespec和pyinstaller的options具有相同的选项,部分参数选项如下:
捆绑数据文件的程序打包
对照实验
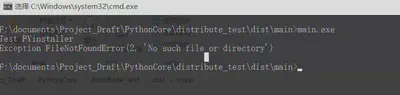
pyinstaller默认不会将数据文件捆绑到打包的文件夹中
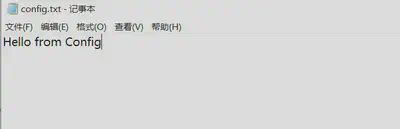
创建一个文本文件config.txt,将lib.py的代码修改为读取config.txt文件的内容在进行打印
# lib.py
def hello(msg="deafule"):
    with open("config.txt", "r") as fr:
        print(f"{fr.read()}, {msg}")
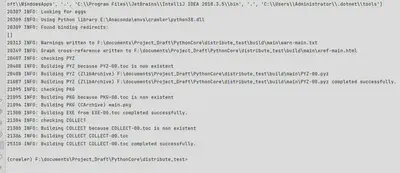
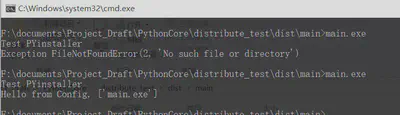
然后使用默认spec文件的参数对程序进行打包,你会发现config.txt文件没有被打包到dist目录下,运行main.exe自然也是以失败告终。
要将数据文件(此例的config.txt)打包,需在spec文件的Analysis.datas属性 进行 配置,如以下语句意味着你希望将当前目录下的config.txt文件打包到打包文件的根目录下。
datas = [('config.txt', '.')]
# main.spec
# ...
a = Analysis(
    ['main.py'],
    pathex=[],
    binaries=[],
    datas=[('config.txt','.')],
    hiddenimports=[],
    hookspath=[],
    hooksconfig={},
    runtime_hooks=[],
    excludes=[],
    win_no_prefer_redirects=False,
    win_private_assemblies=False,
    cipher=block_cipher,
    noarchive=False,
)
# ...
当然,也可以在命令行中通过–add-data参数指定捆绑打包数据文件,参数的官方说明如下:
--add-data <SRC;DEST or SRC:DEST>
Additional non-binary files or folders to be added to the executable. The path separator is platform specific, os.pathsep (which is ; on Windows and : on most unix systems) is used. This option can be used multiple times.
还可以打包整个文件夹,或使用通配符来指定多个待打包的数据文件,如:
added_files = [
         ( 'src/README.txt', '.' ),
         ( '/mygame/data', 'data' ),
         ( '/mygame/sfx/*.mp3', 'sfx' )
         ]
a = Analysis(...
         datas = added_files,
         ...
         )
pyinstaller打包的程序安全吗?
源代码是否会泄漏,能否加密打包?
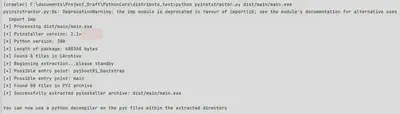
使用开源工具pyinstxtractor测试
工具下载地址
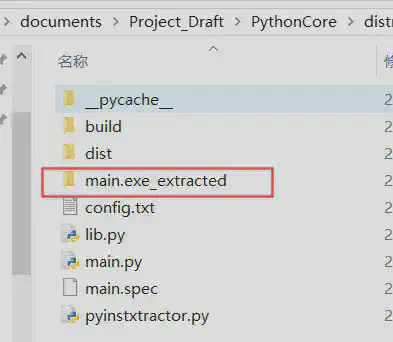
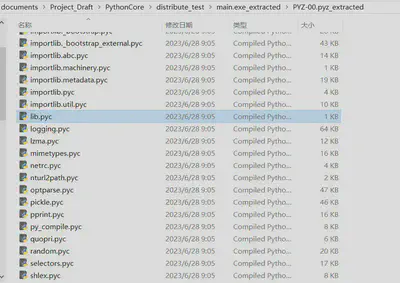
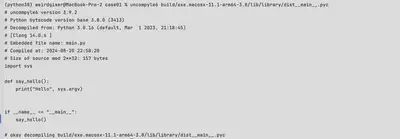
尝试对pyinstaller打包生成的main.exe文件进行解包,可以发现,解包完成后多了一个main.exe_extracted目录,其中一个子目录 中全是pyc文件
尝试使用uncompyle6对上面过程得到的pyc文件进行反编译。
pip install uncompyle6

https://github.com/rocky/python-uncompyle6/issues/320
https://github.com/rocky/python-uncompyle6/issues/216
有人反映可能是由于pyc文件首部“损坏”导致无法反编译,对此未进行测试,但侧面反映了pyc文件对于源代码具有一定保护作用。
Windows平台下执行打包程序遇到的一些问题
-
中文字符乱码导致无法正常执行程序
将cmd字符集设置为utf-8
chcp 65001
参考文档
0x02 Nuitka
有网友推荐Nuitka,反馈其效率比pyinstaller更高。
nuitka安装方法
pip install nuitka
生成可执行文件
基本使用方法:
python -m nuitka main.py
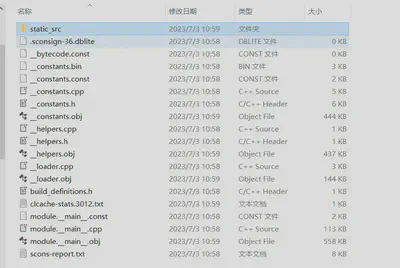
打包后生成一个main.build文件夹,其中可发现nuitka已经将python模块及扩展转换成了c层次的代码。 Nuitka使用C编译器将转换后的代码编译为可执行文件。生成的目标文件通常具有".o"或".obj"的扩展名(取决于使用的操作系统和编译器。)
编译库
nuitka --module lib.py
在windows系统中,执行如上命令对lib.py打包,会得到一个动态依赖库(pyd文件)和python接口文件(pyi文件)。
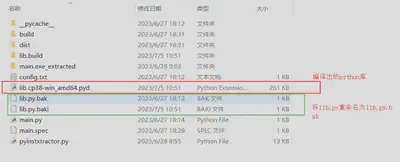
为测试lib.cp38-win_amd64.pyd的可用性,将lib.py重命名为lib.py.bak,执行main.py方法,结果如下:

0x03 Cython
pip install Cython
import sys


def say_hello():
    print("Hello", sys.argv)


if __name__ == "__main__":
    say_hello()
# setup.py
from distutils.core import setup
from Cython.Build import cythonize

setup(
    name="Python Core",
    ext_modules=cythonize("main.py")
)

0x04 Cx_Freeze
特点:跨平台,支持python3.8-3.12
简单使用方法
示例1:单源码文件示例
# main.py
import sys


def say_hello():
    print("Hello", sys.argv)


if __name__ == "__main__":
    say_hello()
使用cxfreeze打包
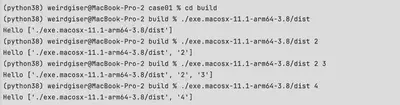
cxfreeze --script main.py --target-name dist
得到打包目录:
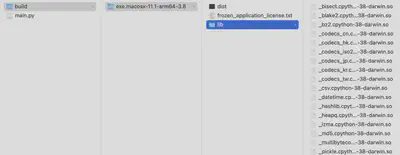
注:打包得到的build/lib目录下有一个压缩包library,包含所有涉及的.pyc文件,删除library.zip后生成的可执行文件将无法运行。
可以使用uncompley反编译得到源码。
示例2:读取外部配置文件
# main.py
import json
import os
import argparse

def main(config):
    if not os.path.exists(config):
        print(f"config file {config} not found")
        return
    with open(config, "r") as f:
        data = json.load(f)
        print(data)

if __name__ == "__main__":
    parser = argparse.ArgumentParser()
    parser.add_argument("--config", default="config.json", type=str, help="your config file")
    args = parser.parse_args()
    main(args.config)


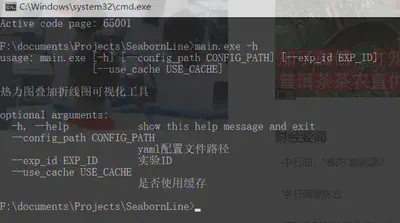
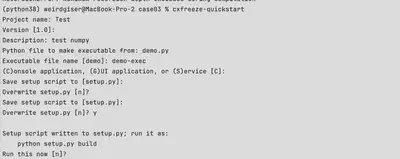
示例3: cxfreeze-quickstart
# main.py
import json
import logging
import os
import argparse
import numpy as np

def main(config_path):
    size = None
    if not os.path.exists(config_path):
        logging.info(f"config file {config_path} not found")
    else:
        with open(config_path, "r") as f:
            config = json.load(f)
        size = config.get("size", None)
    if size is None:
        print("size not set, using default size 3")
        size = 3
    print(f"size {size}")
    return np.random.rand(size,size)

if __name__ == "__main__":
    parser = argparse.ArgumentParser()
    parser.add_argument("--config_path", default="config.json", type=str, help="your config file")
    args = parser.parse_args()
    res = main(args.config_path)
    print(res)
示例4: 读写文件
# demo.py
import os

from bs4 import BeautifulSoup
def timer(func):
    import time
    def wrapper(*args, **kwargs):
        start = time.time()
        result = func(*args, **kwargs)
        print(f"Time cost: {time.time() - start}")
        return result
    return wrapper

class HtmlParser:
    def __init__(self, html):
        self._html = html
        self._soup = BeautifulSoup(self._html, 'html.parser')
    def get_text(self):
        return self._soup.get_text()

    def process_a_tag(self):
        for a in self._soup.find_all('a'):
            a.attrs["target"] ="_blank"

    def get_html(self):
        return self._soup.prettify()
@timer
def helper(html):
    parser = HtmlParser(html)
    parser.process_a_tag()
    return parser.get_html()

@timer
def helper2(html):
    import re
    pattern = re.compile(r'<a href="(.+?)">', re.S)
    return pattern.sub(r'<a href="\1" target="_blank">', html)


if __name__ == "__main__":
    import argparse
    parser = argparse.ArgumentParser()
    parser.add_argument("--html_path", type=str, help="your html file path")
    args = parser.parse_args()
    html_path = args.html_path
    if not isinstance(html_path, str) and not isinstance(html_path, int):
        print(f"html_path must be a file path, got {html_path}")
        exit(1)
    if os.path.exists(html_path) and not os.path.isfile(html_path):
        print(f"html_path must be a file path, got {html_path}")
        exit(1)
    elif not os.path.exists(html_path):
        print("html_path not found")
        exit(1)
    with open(html_path, 'r', encoding='utf-8') as f:
        html = f.read()
    html_write_path = html_path.replace('.html', '_new.html')
    with open(html_write_path, 'w', encoding='utf-8') as f:
        f.write(helper2(html))
    html_write_path = html_path.replace('.html', '_new2.html')
    with open(html_write_path, 'w', encoding='utf-8') as f:
        f.write(helper(html))
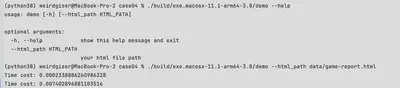
示例5: 跨平台程序打包
0x04 pyarmor
python源码加密混淆库,并且集成了pyinstaller,可以在加密混淆后将项目源码打包成可执行文件。
pyarmor gen -O dist src
打包程序反编译
- uncompyle6